So for a while now I've been wondering how to make my .NET application automatically deploy the .NET 3.5 framework alongside the app. In order to make the user installation experience easier for them.
Having looked into it over the last couple of days I was unable to find explicit instructions on how to package the framework with the installer, just clues that suggested it was possible. So after following these clues I seem to have managed to solve it and thought I'd better blog it so that next time I need it I can find out how it was done easily, and also to share the info with the wider world.
So here goes...
First of all you need to create a deployment (setup project) for your .NET application. I have used VS2008 for this example but the experience is the same with VS2005.
I won't go into the details of this as there are plenty of examples available, such as
this one.
Once you have your setup project, it's time to add the prerequisite of the appropriate .NET framework. My example demonstrates this with the .NET framework 3.5 SP1, but I am assuming that the process is pretty similar for the other versions.
So, first off you need to right click the setup project and choose properties, this will open the project properties window, shown below.
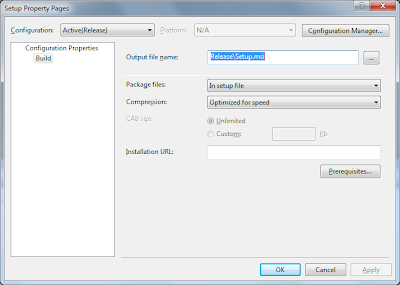
Here I have selected to package the prerequisites "In setup file", "Optimized for Speed". You may decide to select different options here.
Now click the Prerequisites button
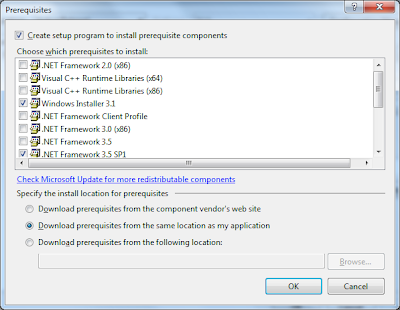
Select Windows 3.1 Installer and the .NET Framework version you require. The 3.1 installer is required for the .NET installer to run!
The three options at the bottom enable you to select how you want to deploy the prerequisites.
Option 1. Download prerequisites from the component vendor's web siteThis option tells the installer to download the install files for your prerequisites when they are required, this means that if the client computer doesn't have them already installed, they will have to download the install files from Microsoft's website. This is good for lightweight installations but not if you want to speed up installation for your users, as it relies on fast connection to the internet.
Option 2. Download prerequisites from the same location as my application
This option is the one I am going to discuss in this post, as it ensures that the prereq's are distributed together with your application. This makes your deployment package larger but means that everything is in one place and provides an easy installation procedure for your end users. I will go into further detail below.
Option 3. Download prerequisites from the following location
This option allows you to point the installer to a location on your network where the prereq install files can be found. It is obviously intended for internal solutions, where the network location is always accessible.
We are going to use the second option, in order to package the prerequisites with our installer. Make sure you have selected it and then click OK to continue.
Now the first time you build the setup project you are likely to encounter the following error...
The install location for prerequisites has not been set to 'component vendor's web site' and the file 'DotNetFX35SP1\dotNetFX20\aspnet.msp' in item '.NET Framework 3.5 SP1' can not be located on disk. See Help for more information.
There will be quite a few of these similar messages. This is where the hunt for information begins, and hopefully where this blog post can help you!
As you know, what happens when you select option 2, is that the installer now attempts to create a setup bootstrapper which packages the prerequisite installers with your software package.
To do this, it needs to have access to the install files for the framework. This error message is telling us that the files are not in the location it is expecting to find them, however it doesn't go any further and tell us where it's looking!!
So, how do we go about solving this error?
First you need to download the re-distributable installer for the appropriate prerequisites, if it is the .NET framework 3.5 SP1, then go
here and make sure you scroll down to the
Full package link and download that. It is ~250 MB. Be careful not just to download the web installer which is only 2.8MB.
Once you have the file, you need to unpack it to a location on your computer. I used Winzip to extract the installer but I am sure there are other ways.
Once you have done this, open the wcu\dotNetFramework folder
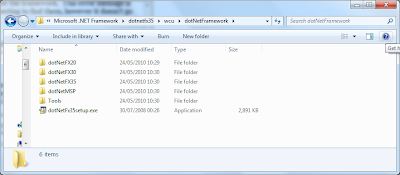
Now you need to copy all of these files to the location that the Visual Studio deployment tool expects to find them. This location will be dependent on the version of the framework you are installing, and the version of Visual Studio you are using.
These examples should work for version 3.5 SP1 on 32-bit windows. If you have x64 OS, then the Program Files folder will be C:\Program Files (x86)\...
Visual Studio 2008:C:\Program Files\Microsoft SDKs\Windows\v6.0A\Bootstrapper\Packages\DotNetFX35SP1
Visual Studio 2010:C:\Program Files\Microsoft SDKs\Windows\v7.0A\Bootstrapper\Packages\DotNetFX35SP1
Simply paste all of the files you extracted into the appropriate folder, then retry building your setup project.
All being well you will now have a fully working installer.
Any questions, comments welcome and I will try and answer them!
Matt
 Head Command Properties
 Tail Command Properties
 Middle Command Properties

