While setting up a new server recently we needed to use Bitlocker within a virtual machine, whilst using a removable key for security.
The critical information was found here:
http://www.ravichaganti.com/blog/?p=64
Thursday, 12 May 2011
Friday, 10 September 2010
FileMenu Tools - Running Unix tools from the right click menu
For a long time I have been after a way to "head" or "tail" a file simply by right clicking it and selecting an option from the drop down menu. I was also keen to find a way to copy a full path to the clipboard through the right click menu too.
After a bit of searching for the Copy Path functionality, I came across a great little utility called FileMenu Tools, developed by LopeSoft and best of all it's freeware!
I was able to use this to add "Copy Path" and "Copy Name" to the right click menu.
Then I noticed the "Custom Command" option, and started thinking about how I could use it for the head/tail functionality.
I have Cygwin installed, which gives you access to many unix programs compiled for Windows, including Head/Tail, but in the past I've had to open a command window, browse to the folder and then type out the required head/tail command, followed by piping (>) the output stream to a new file. I had to have an environment PATH variable set to C:\Cygwin\Bin folder to get this to work.
So all I needed was a way to use the Custom Command functionality of FileMenu tools, to add commands to Head and Tail the files.
I had a bit of an issue passing my usual string as arguments to the head/tail .exe's directly, as the pipe and subsequent output filename were being taken in as parameters and not used by the method. I realised that it is the Command prompt that handles the redirection of the output to a file, so I managed to get it working by invoking the command prompt to run the head/tail method instead of calling them directly.
The command I used was:
cmd /C C:\Cygwin\bin\head.exe -N inputfile.txt > outputfile.txt
Using cmd /C tells cmd.exe to fire the following command and then exit. If you want to leave the prompt open you can use /K.
Next to get this working with FileMenu Tools...
Open FileMenu Tools and select Add Command from the menu on the LHS.
Here are the settings you'll need:
Program Properties
For all unix commands,
Program: C:\WINDOWS\system32\cmd.exe
Arguments
FOR HEAD:
Arguments: /C "C:\Cygwin\bin\head.exe" -@How many lines?@ %FILENAME1% > %FILENAME1%.head.%FILEEXT1%
FOR TAIL:
/C "C:\Cygwin\bin\tail.exe" -@How many lines?@ %FILENAME1% > %FILENAME1%.tail.%FILEEXT1%
FOR MIDDLE:
/C "C:\Cygwin\bin\tail.exe -n +@Start at line:@ %FILENAME1% | head -n @How many lines?@ > %FILENAME1%.middle.%FILEEXT1%"
This asks the user the question "How many lines?" and replaces the statement with the response.
In these examples, the output file is appended with "head", or "tail", and then the same extension as the original file.
Once you get the hang of it you can extend the functionality to other methods, I have also implemented "Middle" to get a sample of lines from the middle of a file.
Settings
 Head Command Properties
 Tail Command Properties
 Middle Command Properties
Monday, 24 May 2010
Building VS2008 deployment project with .NET framework prerequisites
So for a while now I've been wondering how to make my .NET application automatically deploy the .NET 3.5 framework alongside the app. In order to make the user installation experience easier for them.
Having looked into it over the last couple of days I was unable to find explicit instructions on how to package the framework with the installer, just clues that suggested it was possible. So after following these clues I seem to have managed to solve it and thought I'd better blog it so that next time I need it I can find out how it was done easily, and also to share the info with the wider world.
So here goes...
First of all you need to create a deployment (setup project) for your .NET application. I have used VS2008 for this example but the experience is the same with VS2005.
I won't go into the details of this as there are plenty of examples available, such as this one.
Once you have your setup project, it's time to add the prerequisite of the appropriate .NET framework. My example demonstrates this with the .NET framework 3.5 SP1, but I am assuming that the process is pretty similar for the other versions.
So, first off you need to right click the setup project and choose properties, this will open the project properties window, shown below.
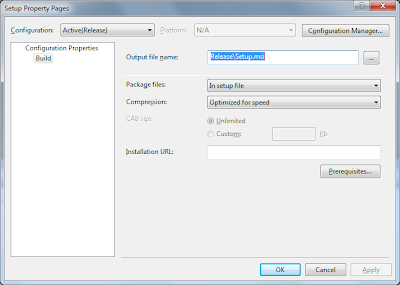 Here I have selected to package the prerequisites "In setup file", "Optimized for Speed". You may decide to select different options here.
Now click the Prerequisites button
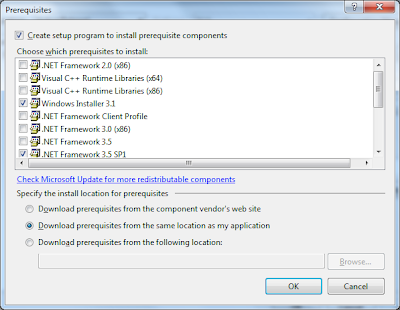 Select Windows 3.1 Installer and the .NET Framework version you require. The 3.1 installer is required for the .NET installer to run!
The three options at the bottom enable you to select how you want to deploy the prerequisites.
Option 1. Download prerequisites from the component vendor's web site
This option tells the installer to download the install files for your prerequisites when they are required, this means that if the client computer doesn't have them already installed, they will have to download the install files from Microsoft's website. This is good for lightweight installations but not if you want to speed up installation for your users, as it relies on fast connection to the internet.
Option 2. Download prerequisites from the same location as my application
This option is the one I am going to discuss in this post, as it ensures that the prereq's are distributed together with your application. This makes your deployment package larger but means that everything is in one place and provides an easy installation procedure for your end users. I will go into further detail below.
Option 3. Download prerequisites from the following location
This option allows you to point the installer to a location on your network where the prereq install files can be found. It is obviously intended for internal solutions, where the network location is always accessible.
We are going to use the second option, in order to package the prerequisites with our installer. Make sure you have selected it and then click OK to continue.
Now the first time you build the setup project you are likely to encounter the following error...
As you know, what happens when you select option 2, is that the installer now attempts to create a setup bootstrapper which packages the prerequisite installers with your software package.
To do this, it needs to have access to the install files for the framework. This error message is telling us that the files are not in the location it is expecting to find them, however it doesn't go any further and tell us where it's looking!!
So, how do we go about solving this error?
First you need to download the re-distributable installer for the appropriate prerequisites, if it is the .NET framework 3.5 SP1, then go here and make sure you scroll down to the Full package link and download that. It is ~250 MB. Be careful not just to download the web installer which is only 2.8MB.
Once you have the file, you need to unpack it to a location on your computer. I used Winzip to extract the installer but I am sure there are other ways.
Once you have done this, open the wcu\dotNetFramework folder
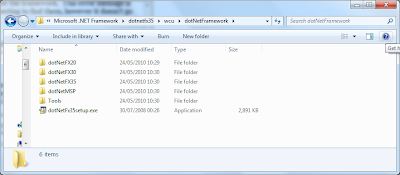
Now you need to copy all of these files to the location that the Visual Studio deployment tool expects to find them. This location will be dependent on the version of the framework you are installing, and the version of Visual Studio you are using.
These examples should work for version 3.5 SP1 on 32-bit windows. If you have x64 OS, then the Program Files folder will be C:\Program Files (x86)\...
Visual Studio 2008:
C:\Program Files\Microsoft SDKs\Windows\v6.0A\Bootstrapper\Packages\DotNetFX35SP1
Visual Studio 2010:
C:\Program Files\Microsoft SDKs\Windows\v7.0A\Bootstrapper\Packages\DotNetFX35SP1
Simply paste all of the files you extracted into the appropriate folder, then retry building your setup project.
All being well you will now have a fully working installer.
Any questions, comments welcome and I will try and answer them!
Matt
Having looked into it over the last couple of days I was unable to find explicit instructions on how to package the framework with the installer, just clues that suggested it was possible. So after following these clues I seem to have managed to solve it and thought I'd better blog it so that next time I need it I can find out how it was done easily, and also to share the info with the wider world.
So here goes...
First of all you need to create a deployment (setup project) for your .NET application. I have used VS2008 for this example but the experience is the same with VS2005.
I won't go into the details of this as there are plenty of examples available, such as this one.
Once you have your setup project, it's time to add the prerequisite of the appropriate .NET framework. My example demonstrates this with the .NET framework 3.5 SP1, but I am assuming that the process is pretty similar for the other versions.
So, first off you need to right click the setup project and choose properties, this will open the project properties window, shown below.
 Here I have selected to package the prerequisites "In setup file", "Optimized for Speed". You may decide to select different options here.
Now click the Prerequisites button
 Select Windows 3.1 Installer and the .NET Framework version you require. The 3.1 installer is required for the .NET installer to run!
The three options at the bottom enable you to select how you want to deploy the prerequisites.
Option 1. Download prerequisites from the component vendor's web site
This option tells the installer to download the install files for your prerequisites when they are required, this means that if the client computer doesn't have them already installed, they will have to download the install files from Microsoft's website. This is good for lightweight installations but not if you want to speed up installation for your users, as it relies on fast connection to the internet.
Option 2. Download prerequisites from the same location as my application
This option is the one I am going to discuss in this post, as it ensures that the prereq's are distributed together with your application. This makes your deployment package larger but means that everything is in one place and provides an easy installation procedure for your end users. I will go into further detail below.
Option 3. Download prerequisites from the following location
This option allows you to point the installer to a location on your network where the prereq install files can be found. It is obviously intended for internal solutions, where the network location is always accessible.
We are going to use the second option, in order to package the prerequisites with our installer. Make sure you have selected it and then click OK to continue.
Now the first time you build the setup project you are likely to encounter the following error...
The install location for prerequisites has not been set to 'component vendor's web site' and the file 'DotNetFX35SP1\dotNetFX20\aspnet.msp' in item '.NET Framework 3.5 SP1' can not be located on disk. See Help for more information.There will be quite a few of these similar messages. This is where the hunt for information begins, and hopefully where this blog post can help you!
As you know, what happens when you select option 2, is that the installer now attempts to create a setup bootstrapper which packages the prerequisite installers with your software package.
To do this, it needs to have access to the install files for the framework. This error message is telling us that the files are not in the location it is expecting to find them, however it doesn't go any further and tell us where it's looking!!
So, how do we go about solving this error?
First you need to download the re-distributable installer for the appropriate prerequisites, if it is the .NET framework 3.5 SP1, then go here and make sure you scroll down to the Full package link and download that. It is ~250 MB. Be careful not just to download the web installer which is only 2.8MB.
Once you have the file, you need to unpack it to a location on your computer. I used Winzip to extract the installer but I am sure there are other ways.
Once you have done this, open the wcu\dotNetFramework folder

Now you need to copy all of these files to the location that the Visual Studio deployment tool expects to find them. This location will be dependent on the version of the framework you are installing, and the version of Visual Studio you are using.
These examples should work for version 3.5 SP1 on 32-bit windows. If you have x64 OS, then the Program Files folder will be C:\Program Files (x86)\...
Visual Studio 2008:
C:\Program Files\Microsoft SDKs\Windows\v6.0A\Bootstrapper\Packages\DotNetFX35SP1
Visual Studio 2010:
C:\Program Files\Microsoft SDKs\Windows\v7.0A\Bootstrapper\Packages\DotNetFX35SP1
Simply paste all of the files you extracted into the appropriate folder, then retry building your setup project.
All being well you will now have a fully working installer.
Any questions, comments welcome and I will try and answer them!
Matt
Tuesday, 26 January 2010
QNAP TS-210 - Autorun.sh Subversion
Recently I have been setting up a QNAP TS-210 NAS server for my development tasks such as source control, bug tracking and backup.
I have been very impressed with it but it hasn't all been easy.
Tonight I worked out how to launch the svnserve application on startup by modifying one of the qnap autorun scripts.
Full details are here:
http://forum.qnap.com/viewtopic.php?f=50&t=19696#p108204
I have been very impressed with it but it hasn't all been easy.
Tonight I worked out how to launch the svnserve application on startup by modifying one of the qnap autorun scripts.
Full details are here:
http://forum.qnap.com/viewtopic.php?f=50&t=19696#p108204
Wednesday, 2 September 2009
Excel Setup TextToColumns default
I regularly use Excel's Text to Columns Wizard to convert Pipe "|" separated variable files to excel tables. The format of these files is very similar to comma-separated files (.csv) but uses a pipe character | instead of a comma.
Each time I've done this in the past I've had to manually copy the data in and then go through the wizard, changing the settings from the defaults to Other: | each time. I finally decided to try and change the default behaviour of the T2C wizard to automatically select Pipes instead of Tab.
How do I go about it?
The behaviour of the T2C wizard naturally remembers the last used settings, so once you've manually changed it, it remembers your choices for the rest of the session. The way I have implemented this is to add a workbook into Excel's XLSTART folder, containing a little macro which runs the T2C on a cell and then closes.
This file opens each time Excel starts, changes the t2c setting and closes itself, leaving you with a new empty book.
How To:
Create a new Excel file, press alt-F11 to open the VBA editor.
Double click on the "ThisWorkbook" item in the Project window
Copy and paste the code below into the text area
Close the VBA editor
Type some text into range A1 (anything you like)
Save the file into the following folder, with a useful name:
C:\Windows\Profiles\username\Application Data\Microsoft\Excel\XLStart
'This method lives in the ThisWorkbook code, and will automatically run when the 'workbook is opened.
Private Sub Workbook_Open()
'Turn off screen updating
Application.ScreenUpdating = False
'if the value in range A1 is empty, add a space so that the t2c doesn't fail
If IsEmpty(Range("A1")) Then Range("A1").Value = " "
'run the t2c on range a1 (of this template workbook)
'set the default options, in this case use OtherChar="|"
Range("A1").TextToColumns ConsecutiveDelimiter:=False, Tab:=False, Semicolon:=False, _
Comma:=False, Space:=False, Other:=True, OtherChar:="|"
'Create a new workbook (as book1 is not automatically created any more)
Workbooks.Add
'Turn screen updating back on
Application.ScreenUpdating = True
'Close the template workbook
ThisWorkbook.Close SaveChanges:=False
End Sub
Note that once you have saved the file each time you open it and enable the macro's it will automatically close itself, so if you want to edit it, you'll have to disable macros when prompted to do so.
Hope this helps,
Matt
Thursday, 13 August 2009
Windows server 2003 logon and shut down annoyances fixed!
Something that I have found very annoying with Windows Server 2003 is that it asks you for a reason why you want to shut down, and also that it won't let you shut down the machine before logging in. I can understand why in large business environments this behaviour would be useful but for the way we use it at work it's just a PITA.
Finally remembered to try and resolve it this morning and quickly came across a great post from
Thomas Freudenberg's blog here. Which kills both birds with one stone.
Finally remembered to try and resolve it this morning and quickly came across a great post from
Thomas Freudenberg's blog here. Which kills both birds with one stone.
Friday, 17 July 2009
tasklist and svchost.exe stuff
Came across something that I've often wondered about today.
Why do you always have lots of svchost.exe processes running when you look at task manager?
Well I've just worked out how to find out what they are, which could be very useful in the future if I have to try and fix someones spam-ridden pc again.
The tasklist command prompt tool lists all the running processes on your pc, in a similar fashion to Task Manager, however the strength comes in the parameters you can give it.
typing:
tasklist /SVC
shows the list of processes, with the names of the actual process not just the filename, very useful for identifying unusual processes, it will also tell you what svchost is really running. Useful.
Subscribe to:
Comments (Atom)